The Masterbuilt electric patio grill is a solid pick for anyone who wants a low-fuss, smoke-friendly outdoor cooking setup on a covered patio or apartment balcony. It heats up consistently, keeps temperature fairly stable once it settles in, and requires almost no effort between cooks. That said, it blank" rel="noopener noreferrer">tops out around 275°F and runs on an 800-watt element, so it is a slow, low-and-slow cooker by design, not a sear-everything-at-500°F machine. If you go in with that expectation, you will love it. If you want screaming-hot grill marks, you will be frustrated.
Masterbuilt Electric Patio Grill Reviews and Buying Guide

Willa Brennan
30 Jun 2026
Quick take: is the Masterbuilt electric patio grill worth buying
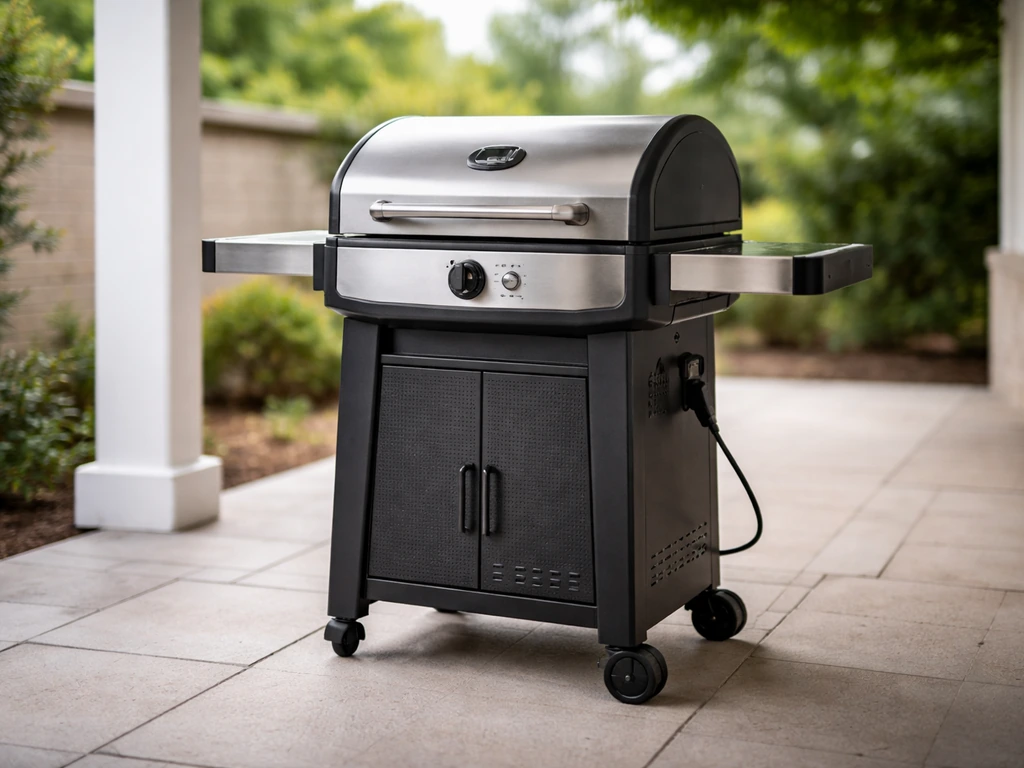
For most homeowners with a covered patio, a small backyard, or an HOA that bans open flames, yes, this grill absolutely earns its spot. Masterbuilt's electric lineup centers on digital temperature control, a straightforward plug-in setup, and a clean cooking experience with minimal flare-ups and manageable odors. The 30-inch models in the lineup, including the MB20071117 and the WiFi-connected MB20070924 (the 710 WiFi), are the most popular choices, and they both deliver reliably on their core promise: set a temp, walk away, and come back to food that is done.
Where it falls short is raw heat output. An 800-watt heating element simply cannot compete with a propane or natural gas burner when it comes to searing speed or performance in cold, windy outdoor conditions. If your patio is fully exposed, winter cooking will test the unit's limits. But for three-season covered patio use, weekend smoking sessions, and anyone who values convenience over char, the Masterbuilt electric is genuinely hard to beat at its price point. If you are comparing it to other patio models, these char griller patio pro charcoal grill reviews can help you judge how it stacks up.
Key specs that matter in real use
Before you buy, these are the numbers that actually affect your day-to-day experience, not just the marketing bullet points.
| Spec | MB20071117 (30-inch Digital) | MB20070924 (710 WiFi Digital) |
|---|---|---|
| Heating element | 800 watts | 800 watts |
| Temperature range | 100°F to 275°F | 100°F to 275°F |
| Cooking area | 710 sq. inches (4 racks) | 710 sq. inches (4 racks) |
| Temperature control | Digital control panel | App + digital control panel |
| Connectivity | None | WiFi (Masterbuilt app) |
| Power source | Standard 120V grounded outlet | Standard 120V grounded outlet |
| Design | Vertical cabinet | Vertical cabinet |
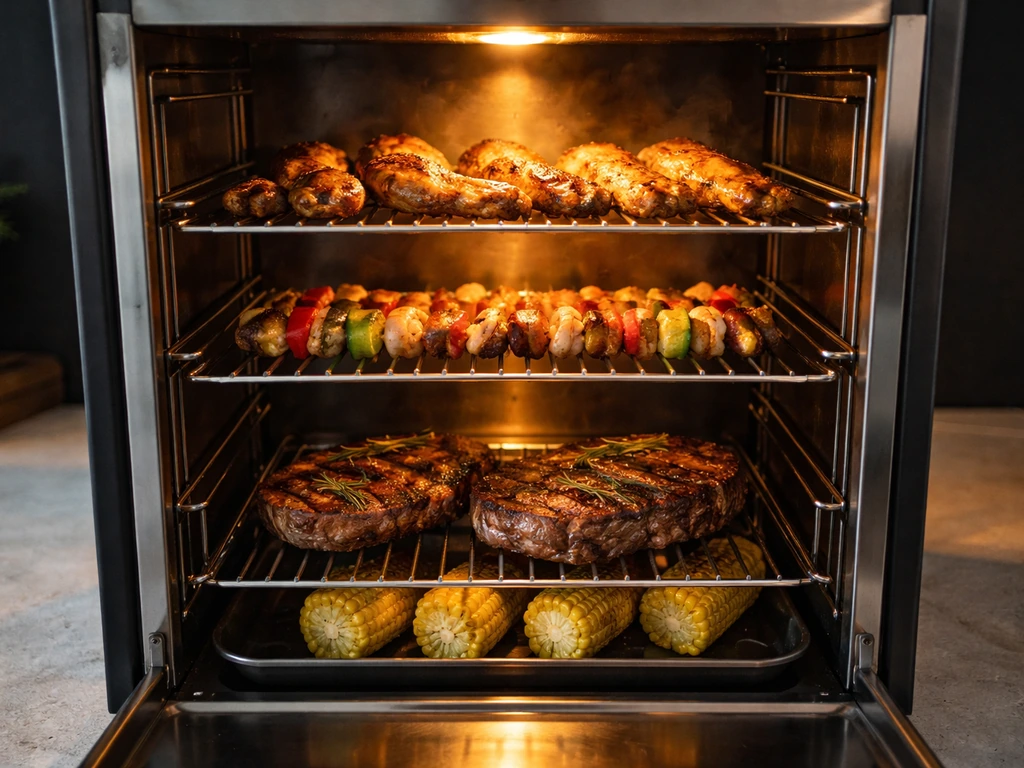
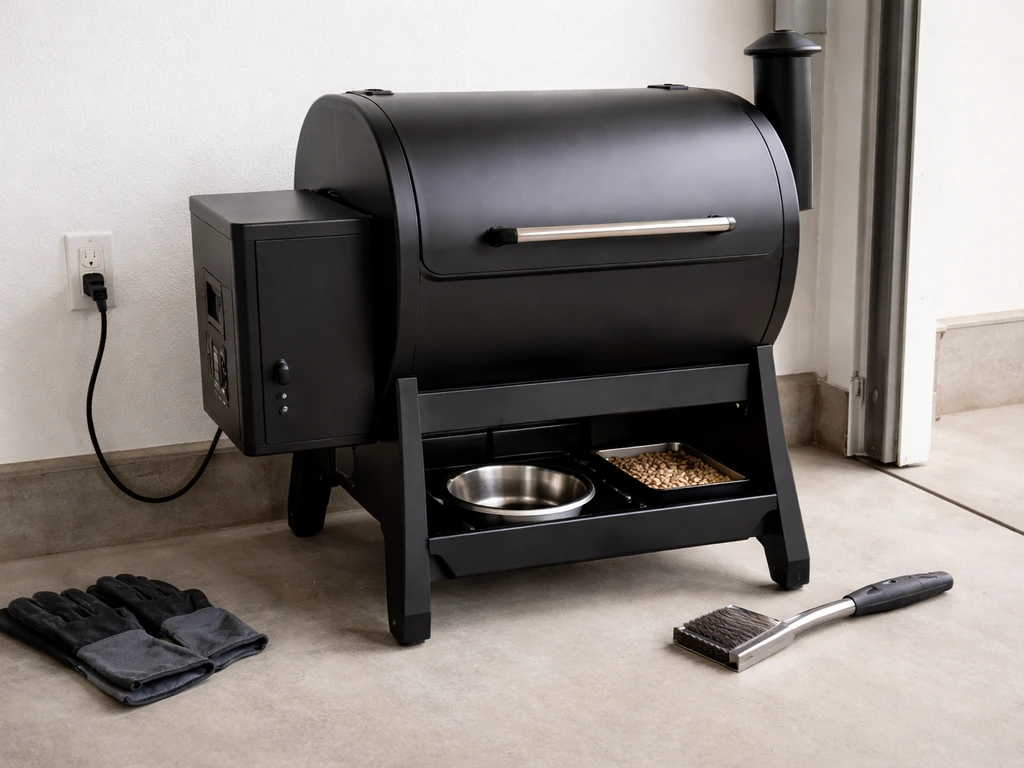
The 710-square-inch cooking space is spread across four racks in a vertical cabinet layout, which is excellent for ribs, brisket, chicken thighs, and whole birds but less intuitive if you think of grilling as flat-surface cooking. That vertical design means you can cook a lot of food at once, but you need to think in terms of rack position rather than just moving food around a flat grate. The 275°F ceiling is the single most important number to internalize before buying: this is a smoker-style electric grill, not a traditional high-heat grill.
The 710 WiFi model adds Masterbuilt app connectivity, which lets you monitor and adjust temperature remotely. On the Masterbuilt 710 WiFi model, the official product page also notes that the app lets you monitor and adjust temperature remotely, with a temperature range of 100°F to 275°F. For long cooks, that is genuinely useful. You can set a smoke session in the morning, head inside, and check the app without going back outside. That feature alone justifies the price difference for most people who do regular longer cooks.
Performance review: heat-up, temperature control, cooking results, and convenience
Heat-up time and temperature stability
Expect roughly 30 to 45 minutes to reach a cooking temperature of 225°F to 250°F from a cold start, depending on ambient outdoor temperature. That is slower than propane but perfectly manageable if you factor it into your routine. Where things get interesting is temperature stability after you hit your target. Electric elements cycle on and off rather than burning continuously, which means you will see some temperature bounce, typically 10 to 15 degrees above and below your set point. On a mild day with minimal wind, that bounce is small. On a cold or breezy day, it widens. Owners in cooler climates report swings of up to 25°F when outdoor temps drop, which is worth knowing if you are cooking through fall or early spring.
Temperature accuracy and what to watch for
This is one area where real-world owner experience diverges from the spec sheet. Some owners report that the actual cooking temperature runs about 25°F cooler than what the digital controller shows, which means if you set it to 250°F, the true internal temp might be closer to 225°F. This is not unusual for electric smokers at this price range. The practical fix is simple: get an inexpensive probe thermometer, verify your actual cooking temp on day one, and adjust your set point accordingly. Once you know your unit's offset, you will cook confidently every time.
Evenness of cooking across racks
The vertical design creates a natural temperature gradient: the bottom rack closest to the heating element runs hotter, and temperatures drop slightly as you move up. Owners have noted differences of 10 to 20°F between the bottom and top racks, with the sides running slightly hotter than the center on some units. For long cooks, rotating your food between racks halfway through levels out the results. It is a minor inconvenience, but it is worth knowing so you are not surprised when one rack finishes faster than another.
Smoke, odors, and patio-friendliness
One of the biggest selling points for patio use is how clean the electric Masterbuilt runs compared with charcoal or even propane. There is no combustion gas, no propane smell, and no charcoal ash. If you add wood chips for smoke flavor, you get controlled, mild smoke output rather than the billowing clouds of a charcoal setup. That makes this grill genuinely appropriate for covered patios, smaller backyard spaces, and neighborhoods with open-flame restrictions. Masterbuilt's official guidance, consistent across all their electric models, is clear: this is an outdoor-only unit and must be kept at least 10 feet from any structure, even though the smoke output is low.
Using it like the manual: setup, controls, safety, and first-cook steps
Where to find your actual manual
Masterbuilt has an official Product Manuals lookup page on their website where you can enter your exact model number (found on the unit's label) and download the correct PDF. This matters because cleaning steps, troubleshooting charts, and control panel layouts vary between models. Do not rely on a generic Masterbuilt manual you find through a third-party site if you want model-specific accuracy. Look up your model number first, then pull the right document.
Assembly and first-time safety checks
Assembly is straightforward since the vertical cabinet design requires attaching legs, inserting the cooking racks, and positioning the wood chip tray and water bowl. The most important safety rules from the official manual family apply to every electric Masterbuilt model:
- Use only a properly grounded 120V outlet. Never use an extension cord or ungrounded adapter.
- Do not plug in the unit until it is fully assembled and positioned outdoors.
- Keep the unit at least 10 feet from any structure, wall, or overhead covering.
- Never immerse the power cord, plug, or control panel in water.
- Do not use the unit as a space heater or for any purpose other than cooking.
Seasoning the unit before your first real cook
- Remove all packing materials and racks, then wipe the interior with a damp cloth.
- Reinstall racks, add the water bowl (empty), and position the wood chip tray.
- Set the temperature to 275°F and run the smoker for 30 to 45 minutes to burn off any manufacturing residue.
- Let it cool completely before loading food for your first real cook.
Using the digital controls day to day
On the standard digital panel models, you power on, set your target temperature using the up/down buttons, set a cook time if desired, and press start. The element cycles on until it hits your set point, then cycles on and off to maintain it. For the WiFi-enabled 710 model, you can do all of this from the Masterbuilt app on your phone, which also lets you monitor the internal temperature in real time. A helpful tip: pre-soak wood chips for 30 minutes before adding them to get a slower, steadier smoke release rather than a quick flare of smoke that burns off fast.
Cleaning, maintenance, and storage for best long-term performance
Masterbuilt's own maintenance guidance is consistent and practical. The core routine is simple: clean after every cook to prevent grease buildup, which is both a performance issue and a safety issue. Grease that accumulates near the heating element is the main cause of off-flavors, inconsistent heat, and potential flare-ups in an otherwise low-flare appliance.
- Cooking racks, water bowl, and drip tray: wash with mild dish soap and warm water after each use. These are the easiest parts to neglect and the most important to keep clean.
- Interior walls: wipe down with a damp cloth. Do not use abrasive scrubbers that could damage the coating.
- Grease tray: check and empty every cook. Grease buildup here is the fastest path to odor and uneven heat.
- Exterior: wipe with a damp cloth. Avoid getting water near the control panel or power connection.
- Heating element: do not scrub or immerse. Wipe gently if visible residue accumulates, and always do so when completely cool and unplugged.
- Storage: store in a dry, covered space. A purpose-fit smoker cover is worth the investment to protect the control panel and exterior from moisture.
One thing many owners skip is the grease tray check between cooks. After a few sessions, grease builds up faster than you expect, especially when cooking fatty meats like pork shoulder or chicken thighs. Making it a habit to dump and wipe the tray every single time extends the life of the unit significantly and keeps flavors clean.
Troubleshooting common problems
Temperature not reaching set point or running low
If your unit is consistently running 20 to 30°F below the set temperature, start by verifying with an independent probe thermometer. If confirmed, check that the door seal is intact and closing tightly, the heating element glows red when running (visible through the chip loader slot), and the outdoor temperature is not below about 40°F (which strains the 800-watt element). Preheating the unit with the door closed for longer before loading food also helps close the gap in cooler weather.
Temperature bouncing or not holding steady
Some bounce is normal behavior for electric elements. However, if swings exceed 25 to 30°F, check for a door that is not sealing well, cracks in the door gasket, or a vent left fully open. Wind hitting the unit directly can also cause significant temp swings. Positioning the unit with its back against a wind break (but still keeping the required clearances from structures) helps considerably in exposed patio settings.
Unit tripping the breaker
This is almost always a circuit issue, not a unit defect. The 800-watt element draws about 6.7 amps on a standard 120V circuit. If you are running the smoker on a circuit shared with other high-draw appliances (outdoor lighting, a second appliance, a power strip), the cumulative load can trip a 15-amp breaker. Move the unit to a dedicated circuit or at minimum a circuit with nothing else running, and the problem usually resolves. If it continues on a dedicated circuit, the heating element itself may need replacement, which is a known wear item on long-used units.
Uneven cooking between racks
As noted in the performance section, the bottom rack runs hotter. If you are cooking multiple racks simultaneously, rotate them halfway through the cook. A flat-top grill patio cover can help shield the cooking surface and control knobs from rain and wind so you get more consistent results. For a single item, position it in the middle rack for the most balanced results. If the left or right side is consistently hotter, try rotating the food 180 degrees at the halfway point as well.
Controls not responding or display errors
If the digital panel is unresponsive or showing errors, the first step is a power cycle: unplug completely, wait 60 seconds, and plug back in. Moisture near the control panel (from rain, steam, or direct washing) is the most common cause of control failures. If the display error persists after a power cycle, pull up the troubleshooting section in your model-specific manual from Masterbuilt's manual lookup page, as error codes vary by model.
How it compares to other patio options
Electric vs propane vs natural gas: the honest comparison
The fuel type question is really a question about what you prioritize on your patio. Here is how they stack up in practical terms: If you are specifically looking for patio gas grill reviews, compare those models against the Masterbuilt’s convenience and temperature control strengths before you decide.
| Factor | Electric (Masterbuilt) | Propane | Natural Gas |
|---|---|---|---|
| Max heat output | Low (275°F, 800W) | High (400°F+) | High (400°F+) |
| Temperature control | Precise digital | Manual knob, less precise | Manual knob, less precise |
| Setup effort | Plug in and go | Tank connection needed | Permanent line required |
| Covered patio safety | Excellent (no combustion) | Needs ventilation | Needs ventilation |
| Cold weather performance | Reduced | Good | Good |
| Smoke/odor output | Very low | Low to moderate | Low to moderate |
| Ongoing fuel cost | Low (electricity) | Moderate (tank refills) | Low (piped gas) |
| Portability | High (cord length limits) | High (tank portable) | Low (fixed line) |
| HOA/apartment friendly | Usually yes | Sometimes restricted | Usually no |
Electric wins on convenience, safety in covered or enclosed patio settings, and ease of use. You plug it in, set a number, and walk away. There is no combustion gas to manage, no propane tank to run out of mid-cook, and no open flame that conflicts with HOA rules or apartment leases. The trade-off is peak heat: if you want to sear a steak at 450°F or cook in 20-degree weather without performance loss, propane or natural gas pulls ahead.
What to choose for covered vs uncovered patios
For covered patios, the Masterbuilt electric is arguably the safest and most practical choice. No combustion gases accumulate under a covered structure, no open flame risk, and the low smoke output keeps the space pleasant. If you are looking for nexgrill patio heater reviews, it helps to compare real-world heat output, controls, and safety behavior in outdoor conditions covered patios. For fully uncovered patios with no wind protection, a propane option handles variable weather conditions more robustly, though you lose some of the precision and convenience. If you are comparing the Masterbuilt electric to propane-fired alternatives or even other electric grill brands, the decision usually comes down to this: if your patio is covered or partially covered, go electric. If it is fully exposed and you cook year-round in cold climates, consider a gas option.
Where the Masterbuilt fits in the broader market
The Masterbuilt electric is not the only option in the electric patio cooking space, and if you are comparison shopping across the broader electric grill category, it is worth looking at how other brands approach the same use case. Masterbuilt's particular strength is its digital temperature ecosystem, including the WiFi app integration on the 710 model, which puts it ahead of simpler analog electric alternatives. For patio-specific propane or natural gas comparisons, the considerations shift significantly toward BTU output and weather resilience, areas where brands designed specifically for high-heat outdoor grilling hold the advantage. The right answer depends almost entirely on your specific patio setup and what you plan to cook. If you are comparing heating performance and daily convenience, these master forge patio heater reviews can help you narrow down the best fit.
FAQ
Will the Masterbuilt electric patio grill work on a balcony or does it have any special restrictions?
It is designed for outdoor use only, and Masterbuilt specifies a minimum clearance from structures (10 feet). On balconies, you should also confirm your building rules for electrical outdoor appliances and verify you can place it so the rear and sides maintain clearances, not just the front. Never operate it under an awning that reduces airflow around the unit.
Can I sear burgers or steaks on this grill, or is it strictly for low-and-slow cooking?
It is not built for high-heat searing since the top temperature is about 275°F and the element is 800 watts. If you want grill marks, you can still cook thin cuts, but expect slower browning. For a better steak result, many owners cook to doneness inside at 250°F then finish with a quick sear on a separate high-heat grill or skillet if allowed.
Why does my thermometer reading not match the grill’s set temperature?
Some units run cooler than the controller indicates by roughly 25°F, so the number on the panel may not equal the actual grate or food temp. The best approach is to verify day one with a probe thermometer placed where food would sit, then record an offset you can reuse for future cooks (for example, if 250°F set reads 225°F, start setting 275°F to target 250°F at the grate).
How do I reduce temperature swings when it is cold or windy?
First, confirm the door gasket seals properly and that vents are set as directed in the manual, since gaps can cause larger swings. Next, position the unit with a wind break on the back side, while still keeping the required clearance from structures. Finally, preheat longer with the door closed before loading food, because electric units stabilize more slowly from a cold start.
Is it normal for the bottom rack to cook faster than the top rack?
Yes, most owners see a hotter bottom rack near the heating element and cooler results higher up, sometimes with side-to-side differences too. If you are cooking multiple items at once, rotate racks halfway through, and if one side is consistently hotter, rotate food 180 degrees at the midpoint to even out browning.
What is the best way to use wood chips without overwhelming smoke?
Pre-soak wood chips for about 30 minutes, then add them to the tray to encourage slower, steadier smoke output. Use smaller amounts if you want a subtle smoke flavor, and avoid adding chips right before peak loading so you do not get a brief burst of heavier smoke early in the cook.
How often should I clean the grease tray and what happens if I skip it?
Wipe and empty the grease tray between every cook, especially after fatty foods like chicken thighs or pork shoulder. Skipping it can lead to faster grease buildup, stronger off-flavors, and more flare-like flare causes even in low-smoke electric units, plus it can contribute to inconsistent heating as deposits accumulate near the element area.
What should I check if the grill keeps running too cool or too hot?
Start by verifying with an independent probe thermometer. If the offset is real, adjust your set point for that unit. If it is not consistent, inspect the door seal, confirm the element glows when running, and avoid using the grill when ambient conditions are very cold (around below 40°F) since the 800-watt element can struggle to maintain temperature.
My display is unresponsive or shows an error, what is the first fix?
Unplug the unit completely, wait 60 seconds, then plug it back in (a full power cycle). Moisture near the control panel from rain or from washing is a common cause, so dry the exterior thoroughly and do not run the unit right after cleaning until it is fully dry. If the error persists, use the model-specific troubleshooting section from the correct manual for your exact model number.
Does it need a dedicated electrical circuit, and could I damage the grill by overloading it?
The element draws about 6.7 amps on a typical 120V setup, so using it on a circuit shared with other high-draw devices can trip a breaker. If you see frequent breaker trips, move it to a circuit with nothing else running, and avoid extension cords or power strips unless the instructions explicitly permit it.
Can I cook on all racks at once without losing results?
Yes, but you will likely need rack management. Plan to rotate foods halfway through and expect shorter cook times for smaller or thinner items since racks can run at different temperatures. If you want the most even outcome for a single large item, placing it in the middle rack typically gives a more balanced temperature profile.